-

Tutorial: NI Massive - Take your Supersaw patches to the next level. Part 1
PREQUEL
Which EDM producers haven\'t been in the situation where they ask themselves - how do the pros really get their supersaws THAT sweet?
We then read all that we may find, and watch a ton of tutorials - but quite often these tutorials doesn\'t give that great results after all.
The patches which are made may often sound unbalanced, and dirty (in a bad way) - compared to these anthem melodies that just sounds truly majestic and clean, yet aggressive and hardhitting.
.
In this tutorial we\'ll go through some tips and tricks to take your supersaw/polysaw/hypersaw sound to the next level!
This tutorial may be aimed toward NI Massive, but surely it can still be implemented in other synths.
More than this, the tips and tricks can be implemented on other synth sounds than supersaws as well.Before moving on, sound designing is an art by itself - these tips may not be what your sound needs every time.
And obvisously you can\'t do all these tips simultanously inside one instance of Massive - if you still want to use every one of them at the same time, you may need to use layers or add processing after the Massive synth in the mixerchannel.Lastly, this tutorial will focus a lot on the sounddesigning itself, than all the different processing tips to enhance the supersaws even more.
This is the part 1 of 2 in this tutorial.
Alright, let\'s start then!
1. THE WRONG DETUNEThis can be a big issue!
Using a heavy detune on the supersaws may not be the way to make it rough and aggressive. I know I have in the earlier days watched a lot of tutorials on supersaws, and many of these sounded so unbalanced and had a pretty nasty detune, since the people giving these tutorials hadn\'t understood this themselves.
Basically, this is a combination of too much detune, and too few unison voices - not to mention the philosphy of "this is the only way of adding detune" - which is clearly wrong. Obviously there are way more ways to add the impression of detuning.
To start with, you have the almighty Chorus-effect.
Now this effect have a pretty bad reputation on certain sounds, because it may soften that kind of sound or push it back in the mix.
But hey, we won\'t use this the wrong way!
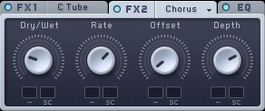
Add the Chorus effect in Massive, decrease the Offset to minimum (but still give a hint offset so you don\'t end up with any heavy combfiltering), now add a lot of Mod Depth and Mod Rate (try to sync these two) - to around 2 o\'clock (no more than 3 o\'clock!). This will sound a little harsh in the beginning, but then cut all the dry/wet-mix down to 0, and start to slowly bring it in at a lower volume.
This can really make the detuning thicker.Now let\'s talk about the classic detuning.
One nice feature in Massive is how many unison voices you may actually have!
And to be honest - by my experience - if you still want to use a very heavy unison detune on a sound in Massive, you may need to use a lot of voices to make it as smooth as possible.
How many voices?
About 10-16 voices (not your usual 8 voices, eh?). But remember, this is for patches where you rely a lot on heavy usage of the classic unison detuning.
So how do many EDM producer do their standard steady yet thick supersaws?
Easy - they go with around 8 voices, but they use a very smooth and steady detune, and then they drench it in noise - yes, they let white noise take part to boost the impression of detune.
But don\'t sit there and think that you suddenly need to add unnecessarily much noise (which could end up sounding like a huge woosh), no – the changes in the noise amounts are very subtle, yet they may have a drastic effect on the sound.
Then of course we have a lot of processing going on in the mixerchannel(s) to take into consideration when trying to get a professional sounding patch.
2. GETTING THE LEVELS RIGHTThis one is vital - that\'s why it\'s nr. 2.
What levels you have on the different oscillators, as well as the different notes - makes or breaks a supersaw.
Make sure you put enough time in getting the oscillator levels right.
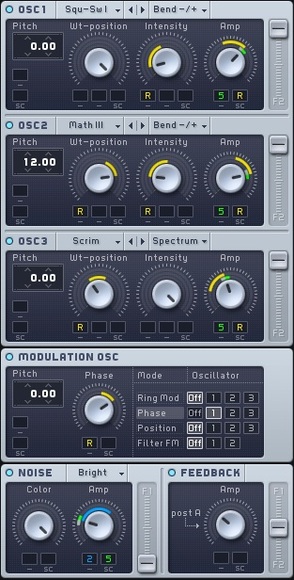
One rule of thumb would be to always try bringing in an oscillator 1 octave above the original oscillator, and another one 1 octave below, just to try it.
Then play with the levels, and even with the different pitches of the oscillators, as long as it improves the sound - sometimes even an oscillator 2 octaves above will do it, while other times the oscillator set to a 5th may do it.
Then don\'t forget to adjust the Velocity on the different notes in the played score.
Sometimes your sound may lack that last "sparkle", and you feel you maybe need to reach for another layer or add a ton of processing - but you might as well consider that you perhaps need to boost the velocity of the highest notes.
Especially this scenario has re-occurred to me, and not only with supersaws, and this move with adjusting the velocity on the top notes have really taken my sound from okay to amazing.
However, the same results can be achieved by adding another synth layer ontop with only the top notes.
Moving on, believe it or not - but in Massive you can use the built in Vibrato under the Osc-tab as detuning.
How do you do this?
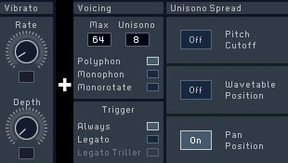
Increase the number of unison voices to at least 8-10, but keep the detuning-box off (wait with it until later), bring the vibrato Rate a bit down so it works smoothly, and only add a hint of vibrato Depth - and voila! Suddenly you have a very smooth kind of detuning.
Adjust the vibrato rate by taste, and now you may turn on the unison detuning if you want to.
Why does this happen?
Probably because there are phase differencies between the different unison voices, so each voice\'s pitch is unique and constantly moving.
Believe it or not, but I have made cool patches that used no classic detuning at all - just the chorus detuning and the vibrato-controlled detuning!
But stack all 3 together, and you may end up with a surprisingly solid sound!3. THE GOOD OL\' LAYERING
While some may be great at getting a huge sounding supersaw with only one layer, others may need several ones.
The art of layering in this case is all about stacking a number of similar sounds to complement eachother and together give a massive result.
In this section I won\'t give you all the tips for layering, as some of them are more suitable for some of the other 9 sections in this tutorial, and therefore have been placed in other sections.
Moving on...
I would say that the most common layer out there, would be the foundation/fundament/depth-layer.
The name says it all – it\'s all about adding the fat depth in the final sound.
Simply copy the patch, or make a new one if you wish, and pitch the performance down an octave. More than this, this layer is more supposed to be smoother and support the other layers, so go easy on the detune, and try doing some basic softening Chorus effect and push it back so the other layers take the place of ”being in your face”.
Lastly, you don\'t need that much of highend, so a simple EQ highshelf cut or a very gentle lowpass inside the patch could do.
Other layers could be layers with different timbres, modulations, and different detuning amounts. Since a heavy detune on a singular supersaw itself may produce a quite dirty and unbalanced sound, another layer with this rough detune (and possibly even more rough) slightly blended in at a lower volume, can make the sound thicker without sounding horrible.
But be careful!
If you keep on stacking layers, they will eventually lose their purpose, and the final sound might turn into a mess that consumes unnecessary headroom.
Remember that each layer should serve it\'s purpose.
More than this, it\'s better to have three or four good layers, than 8 mediocre ones.
4. MAKING IT ROUGHWho loves the sound of a supersaw so rough that it almost sounds like the screeching tires of a drifting car? I know I do (thinking of Steve Angello\'s track "SLVR" with Matisse & Sadko) (link is at the bottom).
Getting this sound requires a lot of different moves, but some of them is all about making the supersaw rough and dirty.
One thing you can do is going to the Osc-tab, head over to the Vibrato, and maximize the vibrato rate. Now try adding just a little bit of vibrato depth, and that itself should be able to make the sound more dirty.
Now note that this is kind of specific for Massive, as Massive have a severely fast Vibrato.
If you did this on other synths, the results could become nothing but cheesy. Then a very lowpitched Frequency Modulator with only a hint of mod-depth would be better.
Another thing you can do is sending an LFO to each oscillator and increase the mod-mix (by adjusting that green thing) a hint (including the noise osc), maximize the LFO rate, and add a dash of LFO depth. This is a very rough effect, so go easy on it.
Most of the times you can add a little more of this effect to the noise section than the oscillators themselves, and you may want to add less of this effect to any low octave oscillator.
Again, Massive has a very, very fast LFO rate, so this might sound unstable on other synths. Then it it would be better to use lowpitched Ring Modulation to mimic this ridiculously fast tremolo.
Moving on, in Massive you have the Master Effects-section, on which you have 3 different Tube Amps. And those who enjoy using these know how rough they can sound.
Give them a chance, add one instance, and play with just a hint of drive (even no drive can still give an effect).
And last but not least, let\'s not forget the sharp layer. The best way to get the sound rough, is to bring in another supersaw instance - this one high pitched, and with crazy and aggressive detune. Then you fade this in ontop of your thick, fat and steady supersaw as a screeching top-layer sparkle.
5. MAKE IT FAT!Once you start playing with the Feedback Amp knob in Massive, you\'ll instantly love it.
Just quickly move it 10-11 o\'clock, and the sound may suddenly get a lot more solid.
More than this, you have the 2 Insert effects, which have 3 different distortion shapes - why not use both of them in serial and use some light drive to fatten it even more?
THE ENDAlright, this is the en of the part 1 of 2 in the Supersaw tutorial - stay tuned for the sequel, as well as future tutorials!
See you then.Author of the article: Steve Hilo - sounddesigner and creator of "The One-Series". Browse catalog of his NI Massive presets and much more at www.123creative.com
24/08/2015 14:55:10
Tweet 
-

Supersaw Stack - NI Massive presets
Supersaw Stack brings you 66 fully ...
-

Pro EDM - 100 presets for Massive
Pro EDM – contains 100 preset...
-

Pro Deep House - 100 Massive presets
Pro Deep House – contains 100...
-

Minimal Rhythms - Massive presets
Minimal Rhythms Massive presets, wi...
-

Melbourne Leads - Massive presets
Melbourne Leads, a sweet collection...
-

Hardstyle - Massive presets
Hardstyle - Massive presets fo...
-

Future Garage - Dark Massive presets
Future Garage contains 50 dark ...
-

Bangin\' Trap - Massive presets
Bangin' Trap contains 100...
Cart
Categories
- GRAPHIC DESIGN resources
-
MUSIC PRODUCTION TOOLS
- Online Mastering
- Plug-ins / Synthesizers
-
Presets / Patches
- MASSIVE presets
- SYLENTH 1 presets
- ALBINO presets
- APPLE LOGIC ES2 presets
- HARDWARE synth presets
- RENEGADE presets
- DUNE / DUNE 2 presets
- Z3TA+ / Z3TA+ 2 presets
- RAZOR presets
- VANGUARD presets
- SERUM presets
- HIVE presets
- OMNISPHERE presets
- BREAKTWEAKER presets
- BAZILLE presets
- SYTRUS presets
- SPIRE presets
- DCAM Synth Squad presets
- PREDATOR presets
- SUBBOOMBASS presets
- TYRELL N6 presets
- THE LEGEND presets
- RETROLOGUE presets
- CHIPSOUNDS presets
- Other synth presets
- Samples / Loops
- DAW templates
- MIDI packs / Construction Kits
- Bundles
- Freebies
- MUSIC VISUALS
-

Download Free high resolution backgrounds - metal, stone, grunge textures -

123creative introduces MIXCRAFT 8 new DAW software + BONUS plugin and samples -

Reasons: Why Professional / Analog Mastering? -

Difference between Home mastering vs Professional audio mastering -

Awesome resources for Halloween graphic design


